Field note 001 · September 27, 2026
The countertop appliance fit plan
The box dimensions tell you where an appliance can sit. Seven additional measurements tell you whether it can open, vent, plug in, operate, and clean up safely.
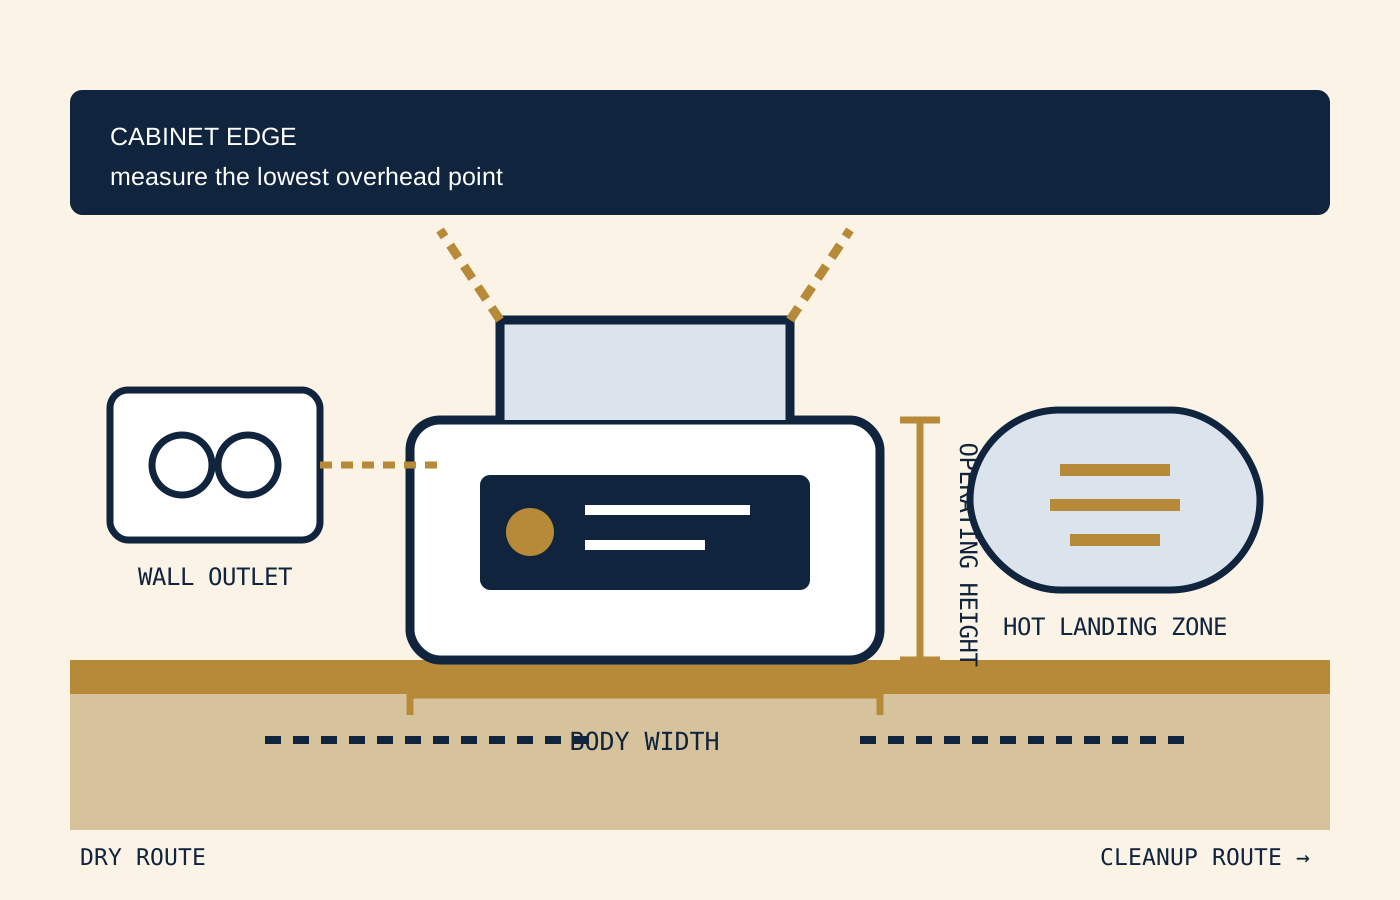
A countertop appliance can fit neatly beneath a cabinet and still be unusable. The lid hits the shelf. Steam rises into the cabinet bottom. The cord cannot reach the intended wall outlet. The hot basket has nowhere safe to land. Cleaning requires carrying a dripping part across the floor.
Those are planning failures rather than product failures. Before comparing finishes or presets, draw the station as it will work: stored, loaded, operating, unloaded, and cleaned. The method below applies to toasters, multicookers, air fryers, blenders, coffee makers, stand mixers, rice cookers, food processors, and similar countertop tools, but the product manual controls the actual placement and clearance requirements.
Record the exact model’s required clearances, electrical rating, surface requirements, ventilation instructions, cord guidance, operating limits, and cleaning method. Do not infer them from another appliance that looks similar. If an outlet is warm, loose, damaged, repeatedly trips a breaker, or an appliance has shocked someone, stop using it and consult a qualified professional.
Measure seven envelopes, not one box
1. The resting footprint
Measure appliance width and depth at their widest points, including handles, knobs, rear housings, feet, and permanently attached cord storage. Compare those numbers with the usable counter surface, not the nominal cabinet width. A backsplash lip, window trim, switch plate, or rounded counter edge can reduce the real footprint.
2. The operating height
Measure the appliance with every lid, hopper, handle, arm, or basket in its working position. A stand mixer may need vertical room for the head to tilt; a coffee maker may load from above; an air fryer basket may need straight withdrawal space. Mark the lowest cabinet, shelf, lighting rail, or trim above it.
3. The manufacturer clearance envelope
Clearance is space the maker requires around or above the unit during operation. It may manage heat, steam, exhaust, access, or fire risk. Copy the values from the current manual for the exact model. Do not count required clearance as storage space, and do not fill it with cookbooks, towels, paper packaging, utensils, curtains, or another appliance.
4. The door, basket, and accessory path
Trace the full motion of the door, basket, carafe, bowl, beater, feed tube, drip tray, or crumb tray. Include your hand and the grip you need when the part is hot or heavy. Check whether an open door crosses a walkway or a basket projects beyond the counter edge.
5. The hot landing zone
Plan a stable, heat-appropriate landing place beside the appliance for the item that comes out. It should not require reaching over a burner, sink, child, pet, cord, or open drawer. U.S. Fire Administration guidance emphasizes keeping combustible items away from cooking areas and turning pot handles away from the edge; the same workflow principle is useful around countertop cooking tools.
6. The filling and cleaning route
Map the path to add water or ingredients and the path removable parts take to the sink. Keep electricity and water separated. The Consumer Product Safety Commission’s home electrical checklist advises locating countertop appliances away from the sink and using GFCI-protected outlets where appropriate. If the intended station depends on reaching across a wet sink, change the layout.
7. The cord and outlet path
The cord should reach the intended receptacle without tension, dangling over an edge, crossing a hot surface, passing through water, or creating a trip or pull hazard. Do not place an appliance first and solve the outlet problem later with an improvised cord.
Plan the electrical path before the purchase
The U.S. Fire Administration advises plugging microwave ovens and other cooking appliances directly into a wall outlet and never using an extension cord for a cooking appliance. It also advises checking cords for cracks, breaks, or other damage. Its appliance guidance says major appliances should be plugged directly into wall outlets and not used with extension cords.
For a countertop planning worksheet, capture:
- the appliance’s labeled voltage, wattage or amperage;
- the length and exit direction of the supplied cord;
- the intended wall receptacle and whether other high-demand equipment commonly shares the circuit;
- whether the manual permits the planned location and connection;
- whether the receptacle is accessible without moving the appliance while hot;
- the date you checked the model in the CPSC recall database.
Do not assume a power strip increases the capacity of a circuit. Do not remove a grounding prong or use an adapter to force compatibility. A repeated breaker trip, warm receptacle, discoloration, buzzing, loose plug, damaged cord, or shock is a stop signal—not a prompt to try a different combination. A qualified electrician can assess the wiring and circuit.
Use a four-zone working layout
| Zone | What belongs there | Planning question |
|---|---|---|
| Load | Ingredients, water, scale, utensils | Can you load without reaching across heat or cords? |
| Operate | Appliance plus all required clearance | Can vents, doors, lids, and controls work unobstructed? |
| Land | Heat-safe space for basket, carafe, bowl, or tray | Can you set down a hot or heavy part immediately? |
| Reset | Cooling, crumb removal, washable parts, dry storage | Can the appliance be unplugged and cleaned as directed? |
Small kitchens may use the same square foot for several zones at different times. That can work when the sequence is explicit. Clear the landing zone before starting; let the appliance and parts cool as directed; reset the surface before the next task. What matters is usable space at the moment each step occurs.
Under-cabinet placement needs a model-specific decision
Do not treat all upper-cabinet space alike. Steam, hot exhaust, grease, and top-opening parts behave differently. Record the manual’s placement and clearance language. If the appliance must be pulled forward for operation, verify that it remains stable, its feet are fully supported, its cord remains slack and protected, and its hot exhaust still clears nearby materials. If the manual does not support the layout, select another station or appliance.
Accessibility is part of fit
A technically sufficient surface may be a poor station if controls are hard to see, the basket is too heavy to move safely, the lid requires overhead reach, or the plug is inaccessible. Measure grip clearance and working height for the people who will use the appliance. A larger unit with easier controls may be a better fit than a compact unit that requires awkward movement.
Run a fifteen-minute station audit
- Photograph the empty counter. Include cabinets, sink, cooktop, outlets, switches, and nearby traffic paths.
- Measure the usable surface. Record width, depth, lowest overhead point, edge shape, and backsplash obstacles.
- Mark the outlet. Note its location and condition. Do not open electrical panels or modify wiring.
- Make a cardboard footprint. Cut the appliance’s stated width and depth, then add separate paper markers for doors, baskets, landing space, and required clearances.
- Rehearse the workflow cold. Pretend to load, open, unload, land, unplug, cool, and move washable parts.
- Read the manual before ordering. Resolve every conflict using the current instructions for the exact model.
- Check recalls. Search CPSC by model before buying and register an eligible appliance after purchase so safety notices can reach you.
Buying record
Keep the decision auditable
Save the model number, manual URL, body dimensions, operating dimensions, required clearances, electrical label, cord length, intended outlet, recall-search date, return window, warranty, replacement-part path, and one photo of the planned station.
A merchandising standard for this preview store
Ultimate Kitchen Supply currently presents unbranded planning briefs. Prices, inventory, checkout, branded specifications, and availability remain disabled until supplier authorization and current commercial terms are documented. Future electrical-appliance listings should show exact model dimensions, open-position dimensions, maker-required clearances, electrical ratings, cord length, included parts, care instructions, warranty source, and recall status. A lifestyle photograph cannot substitute for those fields.
Sources
Reviewed September 27, 2026. Manufacturer instructions govern each specific appliance.